Science Scouts - Botany: Plant Science Unit
- paperandpines
- Sep 1, 2024
- 4 min read
Updated: Jan 20, 2025
With side jobs as flower farmers, it’s no wonder we chose a plant science unit, botany, to be our first area of focus for Science Scouts! And if you’re on a traditional school schedule, spring is the perfect time to study plants with everything still green and blooming. Most of the supplies you’ll need for these activities can be found right outside!
Plant Science Unit
These activities are so fun and engaging for students. We keep a "Science Scouts" notebook for all of these activities, which can be as simple as having students keep up with their observations in a journal! If you'd like a little extra boost getting started, we have created a brief teacher's guide with supply lists, book suggestions, and discussion prompts along with instructions for each activity, as well as student pages they can cut and paste into their journals as they work towards earning their "Botany Badge!"
Read on to discover 8 hands-on activities to bring plant science to life for your young learners!
Plant Life Cycle Necklaces
The first botany activities centered around plant life cycles. We began with reading “Sunflower Houses” by Eve Bunting. This is a great picture book showing a sunflower going through its complete cycle from seed to sprout to maturity, then back to seed.
Making necklaces is the perfect way to model plant life cycles, because they are a visual for how the cycle goes in a continual loop. You can use pre-drawn stages like the ones we used in our Life Cycle Necklace activity, or have students draw their own!
Seed Starting Observation
Conduct a seed-sprouting experiment using a plastic bag, wet paper towel, and a seed. We used pea seeds for ours, because they’re large and sprout quickly which makes them perfect for observation!
Place the wet paper towel inside a clear plastic bag
Set the seed inside and make sure it is in contact with the wet paper towel
Seal and hang in a sunny window
Within days, students will be able to see both roots and a sprout appear. Students observed the seed’s progress each day and kept track of its growth in their Science Scouts journals.
I wanted them to actually see the seed sprout, so this method worked better than simply placing a seed in soil and waiting. We did, however, plant the sprouted seed once we were done observing the growth which allowed us to see the plant go through its entire life cycle.

Watch Plants “Breathe”
Other activities gave kids the chance to explore specific plant functions. We observed transpiration through the “How Plants Breathe” experiment, where we submerged a freshly-picked leaf in water and checked every hour to see bubbles appear along its surface. Students learned that plants release gas through tiny holes, known as stomata. When the bubbles appeared on the leaf’s surface, they could see exactly from where gas was being released.
Watch Plants “Drink”
The classic experiment of placing a light-colored flower or a stalk of celery in water with food coloring allowed the kids to see how water travels up the stem of a plant into its leaves and blooms. We observed the changes over the course of the day and kept track of the changes through drawings in our Science Scouts journals.

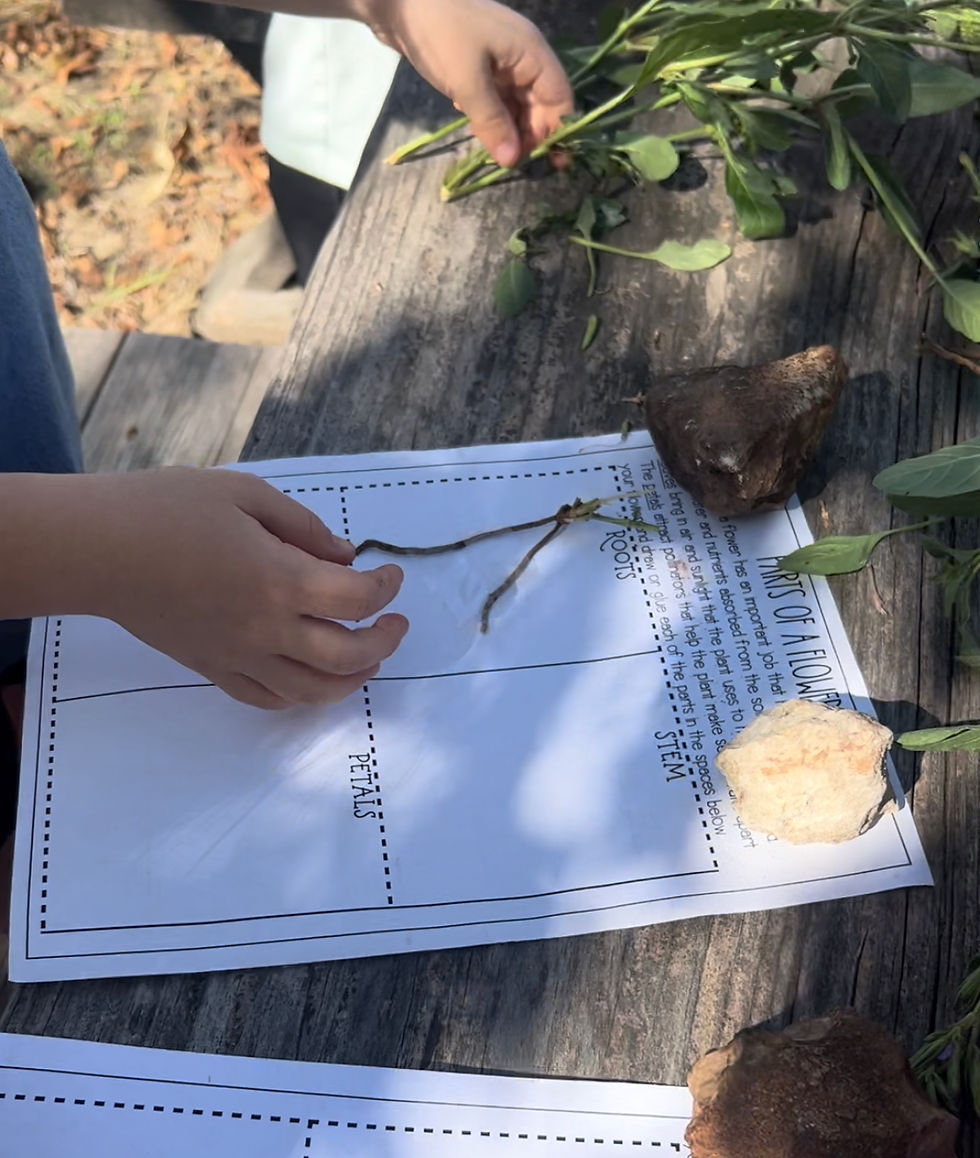
Dissect a Flower
We read a great picture book titled “What’s Inside a Flower” by Rachel Ignotofsky before “dissecting” a flower and discussing the purpose of each part. We divided a paper into four parts and labelled the sections: Roots, Leaves, Stems, and Flowers, and we glued or taped each part down in the correct spot. Older learners could take this a step further to dissect the bloom itself and look at each part such as the pistil and stamen.
Bark and Leaf Rubbings
After reading a few great picture books about trees, students went on a walk to find different types of trees. For each tree, we took a crayon rubbing of the bark and one of the leaves. Then, students identified the tree if known and compared their bark and leaf rubbings with different ones their friends found. Then, we cut and pasted our bark and leaf rubbings into our Science Scouts journals!
Chlorophyll Painting
I think the kids’ favorite parts of this unit were the hands-on creative activities. After discussing what gives plants their green color, students created chlorophyll paintings by mushing up different leaves and grasses with a tiny bit of water to create a green “paint.” For the younger learners, I drew a tree trunk and had students make the “leaves” using chlorophyll.
Nature Stamps
One of the days, we took a nature walk during which I encouraged the kids to find as many unique natural items as they could. They were to look for all different shapes, sizes, and textures. We ended up finding lots of great materials, like empty snail shells, varying seed pods, interesting leaves and pecan shells and peach pits. After we gathered as much as we could find, I set out a bunch of different colors of paint, and the kids used their items as stamps to create unique designs or pictures. Check out our FREE nature stamps teacher's guide and instructions here!

We had so much fun exploring plants with our group of kiddos! They worked hard to earn their “badges,” and their Science Scouts journals are full of great observations.
If you would like to try a Science Scouts unit with your group, I’ve put together a file with all of the student pages and observation sheets I used, as well as a teacher’s guide with supply lists and instructions, a book list of stories we used, and a printable “Botany Badge” the kids can color and paste onto their journals when they’ve finished the unit. It’s available to purchase here on our Teachers Pay Teachers store!


Comments